How to Use Unity MCP with Claude AI to Build Games Without Coding

Advertisements
Advertisements

Imagine this.

You’ve been a game developer for over a decade. You’ve mastered Unity, shipped titles, built teams, and made a living doing what you love. Then one day, your boss walks in and says,

“Hey, you’re out. We’re replacing you with AI.”

It sounds like a dystopian punchline, but it’s becoming reality—fast. And as the saying goes: if you can’t beat them, join them.

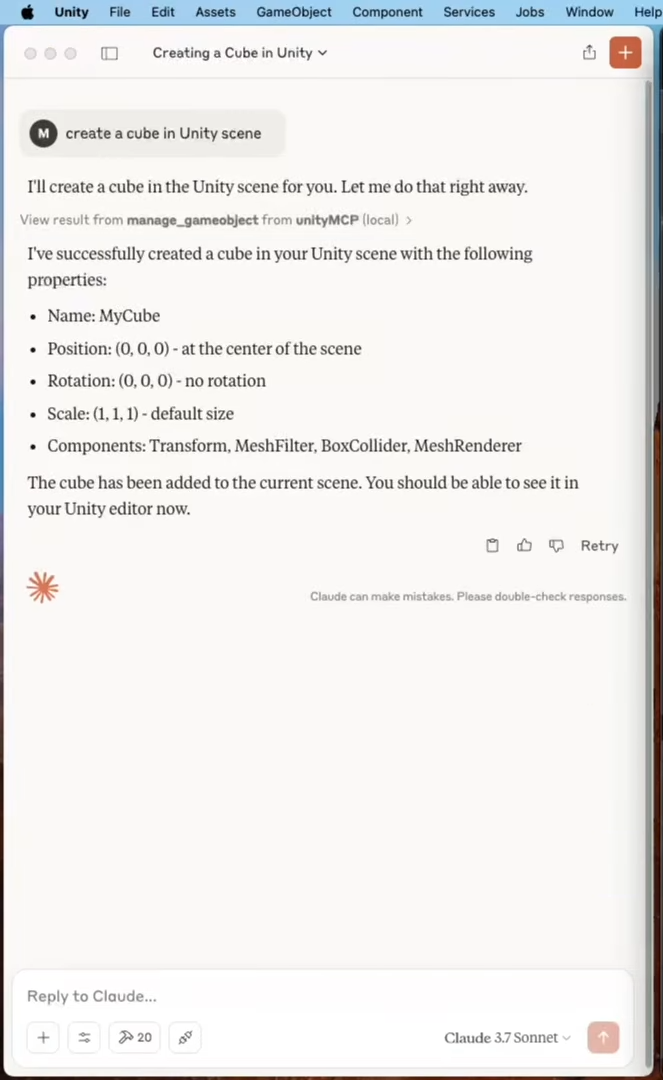
Today, I’m going to show you how to build a fully functional Unity game just by talking to an AI. No coding, no setup headaches—just natural language and a few powerful tools.

The magic behind this? It’s called MCP—the Model Context Protocol.
I’ll break it all down for you, step-by-step.


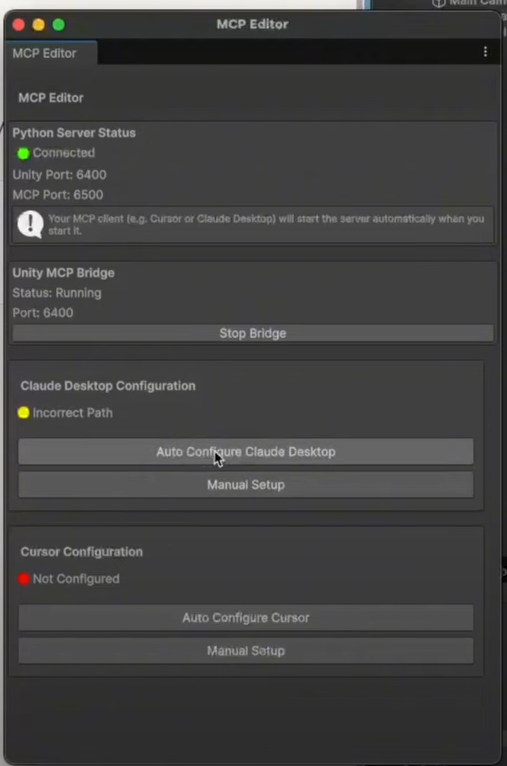
🚀 What Is Unity MCP?

Unity MCP acts as a bridge between Unity and AI assistants (like Claude or Cursor), giving your AI tools the power to interact directly with your Unity Editor. That means:

  • Creating scenes
  • Moving objects
  • Editing scripts
  • Managing assets
  • Automating repetitive tasks

And you don’t touch a thing. You just tell the AI what you want, and it builds it.

At its core, Unity MCP leverages the Model Context Protocol (MCP) to allow real-time collaboration between your LLM (like Claude) and the Unity Editor through a Python-based local server.

In other words: 🧠 Your AI Assistant ↔ 🐍 Python Server ↔ 🧱 Unity Editor


Tools You’ll Need

To get started, you’ll need to install four tools:

  1. Unity 6.0+
    Make sure you’re using Unity 6.0—other versions are buggy with this setup.
  2. Python
    Head to python.org and install the latest version.
    Be sure to check “Add to PATH” during installation.
  3. Claude Desktop (or Cursor)
    This is your AI development assistant—the one that’ll write and manage your game logic.
  4. UV Package Manager
    Makes it easy to install Unity MCP and its components.

Step-by-Step Installation

Step 1: Install Unity MCP in Your Project

  1. Open Unity and your target project.
  2. Go to Window > Package Manager
  3. Click +Add package from Git URL…
  4. Paste in: https://github.com/justinpbarnett/unity-mcp.git?path=/UnityMcpBridge
  5. Click Add.
    This installs the Unity MCP Bridge and a Python MCP Server.

Step 2: Configure Your AI Client

Once the server is installed, you need to link it to Claude (or any other MCP-compatible client).

Option A: Auto Configure (Best for Claude or Cursor)

  • Go to Window > Unity MCP in Unity.
  • Click Auto Configure Claude.
  • You should see “Connected” if it worked.

Option B: Manual Setup

  • Locate the config file for your AI tool.
    • macOS: ~/Library/Application Support/Claude/claude_desktop_config.json
    • Windows: %APPDATA%\Claude\claude_desktop_config.json
  • Add the correct Python MCP server path from your setup.

Test It: Let AI Build Your Scene

Now comes the fun part.

  1. Open Unity.
  2. Open Claude or Cursor.
  3. In Claude, say: “Create a cube in the center of the scene.”

Boom. A cube shows up in your Unity Editor.
Let’s go one step further:

“Make a 3D platformer with basic jumping and moving.”

Just like that, a small playable game begins to form—all created through natural language.


So, What Is MCP Really?

MCP stands for Model Context Protocol—a new way for applications to securely talk to LLMs through a standard interface.

With Unity MCP, you give your AI access to real tools—not just a chat window. It connects your AI to actual Unity functions like:

  • Scene control
  • Asset management
  • Script editing
  • GameObject manipulation

It’s early-stage, but it’s already changing how we think about game development.


Use Cases

Here’s what Unity MCP enables out of the box:

  • 🎮 Build a game world by describing it
  • 🧱 Create and modify 3D objects
  • 🧠 Auto-generate MonoBehaviour scripts
  • 🎨 Manage assets and materials with voice
  • 🧹 Automate cleanup and optimization workflows
Advertisements

Leave a Reply

x
Advertisements